

How To Install Ac Unit On Cargo Trailer

welcome to our trivial blog. Once you accept read upwardly on how we added a Mini Split to our travel trailer, bank check out a few of our other posts well-nigh the other upgrades we have washed:
about calculation solar
how to improve your RV's water
improve cellular connectivity when y'all are in the middle of nowhere and need to work
why we chose lithium batteries and why nosotros beloved them
lots of other upgrades we have washed to our travel trailer
I'g non entirely certain when I offset saw some info on folks using a mini split on a camper or trailer, but I think information technology was this fella from Gone Boondocking. His videos have plenty info for most folks to come up up with a plan to do this install.
In our case, once over again, we enlisted the assist of Eddie Glonek of Mobile Homesteading to help us with the install. Not only does Eddie also have a mini split on his custom built 5th wheel business firm on wheels, only Eddie used to exist an HVAC installer / technician, prior to embarking on his electric current service offerings of Solar Installation and custom RV modification work.
What is a Mini Split ?
Earlier we hash out why we are making this modification, lets respond a common question that we get frequently… what is a mini split ? Basically, its a "heat pump" (pregnant it can heat or cool) that features an exterior unit (Condenser) and an indoor unit (Evaporator) which are connected by refrigerant lines (copper) and an electric line (so the Condenser tin ability the Evaporator, and the indoor unit can send thermostat information).
These types of units are very popular pretty much everywhere on planet earth EXCEPT in the U.s.a.. They are popular because in that location are very efficient, use loads less electricity than a conventional A/C unit, and y'all can place the within unit precisely where yous need the cool (or warm) air, assuming you tin can go your refrigerant lines to an exterior wall (to reach the Condenser)
By and large these units have a congenital in inverter (no, non a standard inverter that inverts DC ability to Air-conditioning power) which regulates the commitment of Air conditioning power to the condenser at a variable charge per unit depending on the demands of the condenser. This is key in how these units can be more free energy efficient than a "normal" A/C unit of measurement.

Why practise nosotros desire a Mini Divide in our travel trailer ?
You may know from our other posts about solar power, that we don't travel with a Generator for electricity. We like to dry out military camp / boondock, which means no "hook ups" to electricity, h2o or sewer. To that terminate, we are always looking for was to be more self-sufficient AND more comfy "off-grid"
One of our missing pieces to the off-filigree puzzle has been Air conditioning when off grid. Our travel trailer came equipped with a 12,500 BTU A/C unit on the roof, which is plenty powerful and probably oversized for our tiny 21 human foot trailer. This tin be hands powered by a 2000 watt or higher generator, if you lot add together an easy first (soft offset) to the A/C unit. The reason this is needed : the amount of Amps of A/C power needed to kick on the compressor is pretty loftier, sometimes over 100 DC amps or more. Most small/portable generators cant supply a spike of AC high plenty to start the A/C unit without a soft start modification.
Indeed, we had done simply that, and added an Easy Beginning to our A/C unit of measurement back in the summer of 2022, which allowed united states of america to run the A/C off of our solar power. However, with 200 ah of Battle Born lithium batteries, the A/C could only effectively run for 2 hours (max) and we would substantially drain our DC batteries to 0 %. And so… yes, information technology worked, but it was comically inefficient, and totally impractical when off-filigree.
Therefore, if nosotros could supersede the rooftop A/C unit with a mini split, nosotros could do the following :
- downsize the BTU rating to more closely match our trailer size (12,500 to 9000 btu)
- reduce the ability consumption from 2000+ watts to about 450-600 watts (while running A/C)
- increase available roof space for more than solar panels
- reduce overall weight on the trailer / roof (the A/C units are HEAVY)
- reduce wind elevate / height of our trailer
- reduce shadowing on existing solar panels from the A/C unit of measurement shroud in early morning / late afternoon
- add together the power to oestrus or cool, work as a fan, and add together the feature of dehumidify
Which Mini Carve up did you buy and why ?
We decided to go with a Fujitsu Halcyon 9000 btu unit, mostly considering Eddie Glonek has had feel with this model (his is the 12000 btu size) in his RV. This unit is Seasonal Energy Efficiency Ratio (SEER) : 16 with a tranquillity 23db racket level for the inside fan unit of measurement.
In his feel as an HVAC specialist, he recommended Fujitsu for their fantabulous warranty. This is Non the cheapest option for mini splits. You can find them for under $700 on amazon, but in this case, we're hoping we "get what we pay for" and chose reliability and warranty over cheap.
according to the specs from Fujitsu (for our 9000 btu unit of measurement) :
cooling current : 7.five amps
heating current : seven amps
maximum cooling electric current : 13 amps
maximum heating current : xiii.five amps
that means that with watts x 120v
that the max this thing would describe is 1620 watts (at 13.5 amps), and about 900 watts (at vii.5 amps) for cooling.
Other required items to practise this installation :
in addition to the Mini Dissever, you'll also demand to buy a "line set" which consists of 2 copper tube lines (for cycling the refrigerant), and some 14/4 control wire to connect the Evaporator to the Condenser. I purchased 30 feet of line set and control wire only to be sure nosotros had plenty to spare. This of course was possible because Eddie could cutting and create flared connections in the copper tube when necessary (the Gone Boondocking example video but uses the entire line ready and doesnt cut anything to size).
also highly recommended, a vacuum pump (to evacuate the condenser lines, and a vacuum gauge to measure / test for leaks. You lot dont desire any air , grit or wet in your lines prior to adding the refrigerant, and you certainly dont desire any leaks in your copper lines.. If yous are doing a "ane time" install of a mini split, you basically will never utilise this tool again, so it would simply exist easier to get an HVAC tech to do this office of the install.
If you lot picket a few installs, some DIY folks just skip the vacuum step, only depending on your install environment (very humid or nigh the ocean, dust, pollen etc.) you may be taking your chances on having contaminated refrigerant, which could cause future maintenance/operation issues.
Another item needed is a way to get Air-conditioning 120 ability to the Condenser. Patently you'll need an open breaker in your AC circuit billow, and some 10/2 Romex wire to brand the run from your billow box, outside to the Condenser unit.
Optional items to exercise this installation :
You'll of course need a mode to mount this to your camper. In our install, we decided to use a RectorSeal Stainless Steel Wall Subclass. Later in this write-upwards you can run across how we used this bracket. Nosotros have seen other folks mount theirs on triangle front end tongue of their trailers, and even on a custom platform built over their LP tanks.
You lot'll also need some sort of leave pigsty through the wall of your camper for the water drain. For this we used a SeaFlow Thru Hull fitting. The idea was to discover something that matched the bore of the drain tube, merely besides looked sorta nice from the outside.
Installation Consideration 1 : where to put the exterior unit (condenser)
On our travel trailer, the just real option was to put the Condenser on the back of the trailer. Nosotros could have possibly created space by reconfiguring our propane tanks (or removing i?) to make enough space on the "A" of our trailer frame for the unit. Another possibility could have been to build a "shelf" frame higher up the propane tanks. That was outside the telescopic of this install so we just decided to put it "somewhere" on the back of the trailer.
There are some advantages to having the unit on the back of the trailer… mostly protection from road debris, wind wear and tear on the Condenser. Possible disadvantages : attaching the unit (bracket) to "annihilation" solid (our trailer is basically plywood, foam and mucilage), and being mounted on a big hollow wall…. possible vibration/racket from the condenser when ramping up.
Installation Consideration 2 : where to put the inside unit (evaporator)
Our Travel Trailer (2017 Rockwood MiniLite 2104S) is quite pocket-size, so the options for placement of the inside Evaporator unit are limited. The inside unit measures :
10 1/4″ loftier x 32 " broad x eight″ deep
Additionally, the manufacturer recommends approximately 2 inches to a higher place the unit for proper airflow.
Inside our travel trailer, the obvious and mayhap the Simply choice for the within unit was on the drivers side betwixt the closet door and the slide-out. As you lot can see in the flick below, there is ample space to fit in the 32″ width of the Evaporator unit, and ample height for the unit of measurement, including the required infinite to a higher place the Evaporator. The depth at eight inches doesn't seem too deep where yous might striking your head on it when getting in and out of the Tater Bed in the middle of the night in a super dark camper.
This as well places the unit of measurement straight above the bed, and so that on a very hot night, the cool air will be bravado on the weary travelers trying to residuum below on the White potato Bed.

Installation Consideration three : how and where to run the refrigerant lines
Now that we know the Condenser will be mounted somewhere on the dorsum of the trailer, and the Evaporator will be mounted on the drivers side between the closet door and the slide-out… where should the "line set" or refrigerant lines run, to connect the Condenser to the Evaporator ?
The lines could run outside on the roof, but we already have multiple solar panels on the roof. To properly make an exterior run, we'd accept accept to reinstall our panels on the commuter's side roof edge. As well, having the refrigerant lines outside exposes them to heat, sun, peradventure damage by a tree or overhead object. If we ran the majority of the lines inside the trailer, it would exist visually unappealing, but overall, a more than efficient (estrus / cool loss) and more durable long term installation.
The picture below shows our solution which was to utilize the empty infinite in a higher place the slide out, to run the refrigerant lines towards the back of the camper.

After entering the wall (pinnacle left of the above picture) , the exact path of the line set run is nonetheless to exist adamant. This will be based on exactly where the Condenser will be mounted. At this point, we take plenty of a concept as to how to move on to the side by side stride.
Step 1 : Removal of original Air Conditioner Unit
At this point, Eddie jumped into activeness and started removing the original A/C unit. After removing the outer housing, the mounting screws for the roof pinnacle unit are exposed.

Once the inside plastic molding is removed, all that remains within is the metallic bracket

One time this bracket is free from the ceiling, the A/C unit of measurement can exist lifted up and away. Eddie cut and capped the original AC power supply likewise every bit all thermostat lines and tucked them inside the ceiling

Here we are walking the original A/C unit downward the ladder from the roof. This this was HEAVY !

Step 2 : Supercede A/C roof hole with a new powered vent fan
Now that there is a 14″ square hole in the roof, what was the program ? Well… we could have built a custom embrace to fill in this hole (and insulated) , merely that would have added a bunch of install fourth dimension and some custom materials. Then… instead we decided to become with an cheap ceiling fan / vent. Nosotros chose the MaxxAir Mini Roof Vent considering it is very sparse (thats the mini office) every bit it extends only 2 7/8 inches above the roof line. We bought this fan from Gander Mountain every bit information technology had costless shipping and cost only $119. The white plastic cover will also allow equally much light in as possible (without beingness articulate, which wasnt bachelor)

Eddie was able to re-use an available 12 volt ability supply from the A/C install to power the new fan. Besides, nosotros verified that subsequently removing the A/C unit, the thermostat still worked every bit expected with the gas estrus furnace.

Now that the A/C unit was gone the new Maxxair Mini fan was replaced in its hole. The purpose of the fan beingness simply 2 seven/viii″ height off the roofline was because we planned to put a solar console OVER the new vent. This volition be covered in a later install post.

Eddie finishing upwards the sealing of the roof vent with Eternabond tape and dicor.

Step three : Test hang of the within Evaporator unit
Hither Eddie is doing a exam hang of the within unit. This metal bracket is screwed into the side wall, and the Evaporator hangs on height of information technology. We wanted to place the unit in its within position so that we can start to come upward with a programme for the line fix (refrigerant line) run to the exterior unit.


Step 4 : Assemble the Condenser Bracket come with a plan for mounting bracket to the trailer
Hither Eddie is assembling the stainless steel mounting bracket and adjustment the rubber feet to fit the Condenser unit

here is a test placement of the condenser unit on the subclass. Taking a look at how information technology will sit on the bracket, allowing enough airflow between the condenser and the trailer

Beneath Eddie is doing a test for fit and position of the bracket. The thought was to use the vertical framing for the refrigerator (seen below near Eddie's correct hand). This means the left side of the bracket should accept some "solid" wood framing inside the camper wall to sink in some lag bolts. The department almost Eddie'south left hand, is an open "chimney" which we can admission through the refrigerator access door. These attachments can be fabricated with large size fender washers and bolts accessed inside the chimney.
Also, below… to be determined, what tin we use as anchors for the horizontal subclass bar and the right side vertical bracket arm. Based on some measurements, it appears as though these "should" enter the camper back wall inside the bathroom cabinet. If and then, nosotros can access this area from the inside, using fender washers and bolts to "squeeze" the trailer dorsum wall, creating an anchor for the condenser unit of measurement bracket.

Pace 5 : Investigate the vertical left side anchor betoken for the condenser bracket, drill a airplane pilot hole to see if we can utilize the bathroom cupboard
At this point, Eddie drilled a pigsty from the refrigerator access door towards the bath closet to investigate the vertical framing for the fridge. Through this hole, we used my trusty boroscope remote photographic camera to investigate exactly what was framing in the fridge. Turns out, equally Eddie suspected there was some woods framing that "should" be plenty to take a few lag bolts (for the left side of the condenser bracket)
Knowing that our plan was pretty solid and so far, Eddie drilled an exploratory hole on one of the right side subclass holes, hoping to land in the bathroom chiffonier

Pace half dozen : Anchor Condenser unit bracket to the camper tail wall, Attach Condenser to bracket
Eddie's measurements and guess work paid off as the exploratory drill pigsty indeed ended up within the bathroom cabinet ! This meant we had a mode to drill through the tail of the camper wall, and have an easily accessible surface area to attach the hardware to secure the bolts. (the pointer below shows the pilot hole). Eddie started drilling out three of the bracket holes. In full, within the cabinet, at that place would exist four bolts across the top, and three bolts along the left side (along the wall of the chiffonier)

Knowing the position of the inside cabinet, Eddie could now pre-drill for the bolt hardware, besides as put downward a good for you layer of silicone to seal around the bolt holes every bit well as offering some adhesion of the bracket to the wall

Here are the final bolts, basics and fender washers (that hold the right side of the condenser bracket). The bolts got cut downward (post-install) to a shorter size later on the install (so that we'd have more than storage room)

With the commodities hardware attached inside the cabinet, and the bolt hardware attached inside the refrigerator chimney access door, Eddie could now apply lag bolts on the left side of the condenser bracket. These are the lags that are going through the fiberglass, luan (plywood), foam, luan and and then the wooden vertical fridge frame.

With the bracket securely fastened to the back of the camper, it was time to attach the condenser to the subclass. This was washed with the hardware that came with the condenser bracket, but Eddie also added some nuts inside the bracket arm, to be sure they wouldn't easily back out and possibly crusade the condenser to spring upwards and down

Step 7 : Programme and prepare for the line gear up to run from the inside evaporator to the outside condenser
The basic idea was, equally previously mentioned, to run the refrigerant lines in a higher place the slideout (tiptop right corner arrow in the flick beneath), dial a hole through the pantry, then run downwardly the correct side of the pantry, across and underneath the fridge, past the water heater, and into the bath cabinet.

Eddie taking a look with his drill as a flashlight… for a adept entry into the bathroom cabinet. the target was a to be drilled hole in the left side wall, creating an opening in the bathroom chiffonier

In the film below (to the left of the water heater), nosotros bust open a "false" wall, that was just roofing a huge space behind the toilet. Basically, the Rockwood installers just paneled over this infinite, because they couldnt be bothered to create another storage space. As you can run into, the space is quite large, basically simply covering some plumbing and wiring.

Now that nosotros had a plan in identify, information technology was time to start drilling holes for the refrigerant lines to pass through. Here Eddie is making a hole to access the pantry chiffonier. The door will have to be re-hung to accommodate the infinite needed for the line prepare.

Step 8 : Run the refrigerant lines and command wire from the Evaporator inside unit to the outside condenser
Now that the holes were drilled along the path of the lines from inside to outside it was fourth dimension to run the refrigerant lines and control wire.
Below, nosotros advisedly uncoil the line fix from the shipping box. You have to be very careful non to crimp either of the copper tubing lines, as whatsoever hard curve or crimp would hateful a refrigerant leakage point.

At present for the catchy parts. feeding the refrigerant lines from outside to within. Due to the nature of our run, we need to make 5 turns along the course. Each time you need to make a 90 degree turn, yous have to exist admittedly sure you dont crimp the copper lines. Feeding the lines through abrupt edges means that the foam exterior insulation collar gets chewed upward and chopped up.
Suffice information technology to say, the more turns you accept to make, the harder this procedure is. On top of that, Eddie indicated multiple times that the quality of the lineset that I purchased was not top notch. Mainly, the insulation tubing was very sparse and crumbly and the copper was of simply acceptable gauge and quality. This fabricated making the twists and turns forth our run very frustrating and difficult. This was the second-most time consuming part of the install.
As Eddie has noted many times during our installs (past and present), the smaller the camper, in general, the harder the install. This is generally but due to space constraints, only too y'all take to be creative with your problem solving and set up for unforeseen roadblocks along the style.

Step 9 : Run AC power from the breaker box to the outside condenser unit
I have no images for this part of the install, but it wasn't all that fun to say the least. While Eddie was working on making the terminal connections to the inside evaporator, and installing the drain, I was working on the electrical wire.
Basically, all that needed to happen was to make a run from the breaker box / distribution panel (on the side of our oven, but the outside door) to the outside condenser unit of measurement.
To do this, I had to cut the ability, pull out the breaker box, fish a line from the breaker box, backside the furnace, underneath the kitchen sink, through the wall to the bathroom, under the bathroom sink, under the shower pan, and out into the newly opened cabinet backside the toilet and out the hole created for the refrigerant lines to the outside.
Sounds easy enough, until its time to actually fish the wire through this run. Luckily, the Romex 10/2 wire is very potent, so you dont demand a fish line. In generally I could strength a decent path with the wire itself, all the way to the end of the run.
All that said, it probably took me most 1.5 hours to get this done, and get information technology continued to the original billow for the Air Conditioner on the AC panel.
The motion-picture show below shows the final pass-through of the power, refrigerant lines and command line. On the left side, is the AC wire coming up from underneath the shower. On the correct side is the refrigerant line and control wire coming from the h2o heater compartment. All of these lines go outside through a new hole to brand the connectedness to the exterior condenser unit of measurement.

Step 10 : Create a bleed hole, connect refrigerant lines, control wire and drain hose to the within Evaporator unit
Using the installation instruction measurements, Eddie drilled a hole in the sidewall to adjust the Evaporator drain.

To make a squeamish closure with a waterproof seal from the outside of the camper, Eddie used a SeaFlow Thru Hull fitting. The inside of this fitting hooks into the drain tube of the evaporator.
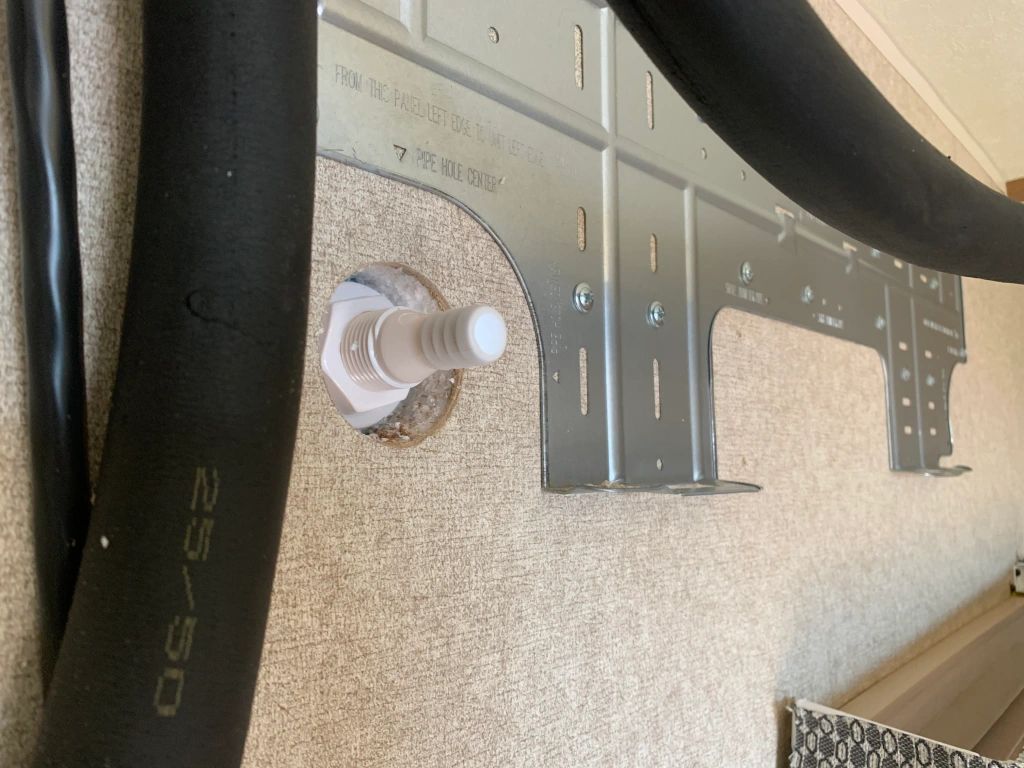
Here is what the Seaflow fitting looks like on the outside of the camper. If there is meaning wet in the Evaporator, it will drain out the sidewall to the outside and drain to the ground

At this point information technology was time to connect the refrigerant lines, drain hose and command wire to the evaporator unit. This was unfortunately the hardest role of the install for a few reasons. For i, information technology seems the instructions from Fujitsu for bleed position, and refrigerant line positioning were incorrect. This meant that Eddie had to do some custom fitment (cutting away some of the plastic housing) and just more often than not manipulating the lines and so the unit would sit affluent on the wall.
This was an extremely frustrating waste of time for Eddie, one that we had not planned on, naturally. Subsequently a considerable effort, Eddie wrangled all the connections and was able to go the unit secured flush to the wall.

But to exist certain the unit wouldn't jump up and off its wall bracket when driving on bumpy road, Eddie added two trivial wooden shims above the evaporator unit. This lock downwards the unit and so it cannot lift off when in transit

Stride eleven : Connect the refrigerant lines, control wires and AC ability to the outside Condenser unit of measurement
As you tin can meet from the fading light, its well-nigh to call information technology quits for this solar day. But before darkness fell, Eddie connected both refrigerant lines, continued the command wire for the Evaporator (blackness cable beneath) also as the AC power for the Condenser. The movie beneath shows the work in progress, merely virtually complete. Things were starting to come together !

Step 12 : Vacuum the refrigerant, bank check for leaks , release refrigerant into system, test system
Here Eddie set up a vacuum pump to the system to pull out whatever air and moisture from the lines. This also allows for a pressure check to be sure that after getting a good vacuum, the organization can hold information technology steady. This manner, you'll know if you take any leaks. Luckily for us, with 5 turns in the lineset run… there were no leaks !

Afterward removing the vacuum pump, nosotros could at present release the refrigerant from the condenser unit into the system. The refrigerant is contained in a reservoir within the Condenser, and so that when your system is closed and ready, you tin can fill with the refrigerant.
At this point, with the mini-split continued to the AC ability (via the old Air Conditioner circuit) and the system leak free and filled with refrigerant, information technology was time to test.
We tested both the cooling and heating modes, all fan features (swing, hello/lo fan) and everything was working as expected.
Here, Eddie is filling all the gaps with expanding foam. This pigsty in the picture is the entry betoken for the lineset as well as the Air-conditioning power every bit it comes out from the bathroom lower cabinet

While it isnt the prettiest thing we'd ever created, we needed a way to "hang" the lineset in a higher place the slideout. The copper needs to be protected from puncture or crimping, and the lineset needs to be out of the path of the dinette slides every bit it opens and closes.
We chose this plastic gutter aqueduct, because its lightweight, and easily anchored on the top to the sidewall of the trailer above the slide out.
This was actually a little trickier than anticipated considering, when the slide goes in and out, at the VERY end of the slideout, it actually raises Upward well-nigh one inch.
This was workable, but only just barely. We just needed to reposition the ugly wooden top moulding (horizontal beyond the slideout face) down slightly. Its really only for looks, and those looks are ugly anyways. It barely noticeable afterwards moving downward depression plenty to clear the last slideout movements and clears the lineset with ease.

The gutter is pretty ugly too ! so we have already begun to decorate this part of the install with tiny pictures that embrace the gutter perfectly. We put on a long strip of velcro to the plastic gutter, and then each picture can exist stuck on, reordering and updating pictures as nosotros proceed. None other so Eddie Glonek pictured in the get-go slot on the left below.

The mini split in action ! testing the unit in some belatedly fall dominicus and heat in western Colorado.

Final Install Thoughts
This install was very complicated, super involved and required a lot of expertise. Nosotros are grateful for Eddie Glonek's difficult piece of work and extensive installation cognition. Equally expected, he did an incredible job, and did information technology right the first time. For the average DIY person, I'd say… you probably should have some assistance for this install, and highly recommend including an experienced HVAC installer, ideally someone with Mini Carve up experience. Or.. just hire Eddie Glonek practise it !
How is information technology working and then far ?
Well, nosotros installed this unit at the very cease of September 2022. Then nosotros oasis't used it a whole bunch thus far. But we have the following info to share so far :
- the indoor and outdoor units are securely continued to the camper (inside and out) , nosotros accept had no issues with the units staying put. We actually don't even call back much virtually them when going off the highway.
- the unit does work well (off grid) when running off of our 2000 watt inverter. In 90F weather, it takes about 1200-1400 watts for initial cooling, then approximately 350-400 watts to keep the camper at temperature (on Economy, quiet fan setting)
- also at 90F, when initial cooling is completed, our incoming solar can supply the entire minisplit free energy needs, when we have total solar incoming. This means when we have approximately 30-35 amps incoming, nosotros can run the mini-split at a "internet zero" where its only consuming the incoming DC solar power.
- the within evaporator unit is more than or less silent on quiet mode.
- the outside condenser unit is Non silent, peculiarly when "ramping upwards" when the system kicks upwardly its power temporarily to "take hold of upward". Because its attached to the back wall of our camper, which is essentially a gigantic foam box, there is some vibration sound on initial ramp upwards. Still after "ramp upwardly" it is non really noticeable, especially if you aren't trying to sleep in total silence.
- that said, fifty-fifty at its loudest, the indoor unit plus the outdoor unit of measurement condenser vibration sound is drastically quieter than our original roof-mounted 12,500 btu unit.
- the sizing of the 9000 btu unit of measurement is more than than adequate to absurd our 21 pes trailer. Nonetheless, we haven't tried in annihilation more 90F rut. Simply we never used anything but economic system (lowest) settings and it cooled the camper to an "uncomfortably cool" inside temp (during testing)
- Using it every bit a heater is also possible of course, and we did test that, just to be honest, nosotros'd exist more than probable to apply the unit as a dehumidifier than a heater. We exercise like the ability though, to have a tertiary heating option (in addition to our furnace, and catalytic heater)
- removing the roof unit of measurement saves weight and frees upwardly more roof space for more solar !
What would y'all have done differently, given the choice?
Well, I'd say, even though running the lineset inside the camper was extremely time consuming, I'd probably go that route again.
But I recall, knowing at present how much vibration is created by the condenser on commencement up / ramp up, I probably would accept spent the time and resources to create a custom mountain / shelf on the front end of the trailer A-Frame. This would have fabricated the refrigerant line run much shorter (from a-frame front to within). Mounting the Condenser on the front of the trailer too increases the take a chance of debris or stone strikes from the tow vehicle.
Another selection, build some sort of contraption off the dorsum of the trailer that hangs on the trailer frame I-Beams.
The idea being, in theory, that having the condenser not physically attached to the sidewall of the camper, just rather to the steel frame, it should be much much quieter.
In the end, this would have drastically increased the complexity and cost of this install, besides as required custom fabrication and welding. You'd have to weigh the options of price vs a little fleck of vibration noise, knowing that in comparison, I'd say the mini-split is probably about 15-20% of the noise level of your common roof mounted A/C unit.
In summary… the vibration racket is not that big of a deal vs beingness uncomfortably hot (or cold) when dry camping ground
Im on the fence… do you lot recommend this mod ?
This is clearly not for "everyone" simply rather for folks who want to extend their dry camping into places where air conditioning would make camping ground more comfortable and don't desire to rely on a generator for electricity to ability a high-energy, traditional A/C unit.
Its a flake too early to report our findings, but and so far… its doing exactly what we had hoped for.
We volition update our long term usage and allow you know more about how we apply this unit and if its meeting our expectations.
Update 12-2021 : cheque out a related video by Eddie well-nigh how he installed a Mini Split up on an Alto travel trailer

Source: https://senormisterioso.wordpress.com/2020/11/15/installing-a-mini-split-air-conditioner-to-a-travel-trailer/
Posted by: porterauntithe.blogspot.com
0 Response to "How To Install Ac Unit On Cargo Trailer"
Post a Comment